Indigo Powder Hair Dye: How to Use + Store It
If you’ve ever mixed indigo powder and watched it turn from earthy green to deep inky blue, you already know this plant has a mind of its own. Indigo is sensory and alive: it blooms with oxygen, reacts to warmth, and rewards a clean workflow. Herbalists love it for the way it can build natural-looking depth, especially when paired with henna, but it’s also famously timing-sensitive. This guide is written for real routines, not “perfect internet hair”. You’ll get practical mixing ratios, simple batching habits, and production-minded details (water temperature, waiting windows, bowl choices, and storage cues) so your results are repeatable.
We’ll focus on a reliable Indigo Powder + Henna Powder workflow that scales from a single bowl to multiple applications, with troubleshooting for the most common “why did it do that?” moments. Along the way, you’ll also see a few herbal add-ins that blend beautifully into a routine, from scalp-friendly cleansers to aromatic botanical rinses.
indigo powder: what it is and why it’s tricky
Indigo comes from dye plants whose color develops through chemistry and oxygen exposure, not just “staining”. That’s the first mindset shift. The paste you mix is a working material with a short peak window. Treat it like fresh craft production: clean tools, measured water, consistent temperature, and a clear plan to apply.
What makes it feel tricky is that it is both fast and fragile. Mixed paste can look promising at minute five, then go dull or weak if it sits too long. It can also grab more intensely on porous hair and less on resistant areas (often the front hairline or greys). The fix is rarely “add more and hope”. It’s usually timing, prep, and consistency.
For best control, you want: a non-reactive bowl (glass or ceramic), warm water (not hot), a thick yogurt texture, and a short rest before use. Keep the workstation calm and organized so you’re not scrambling while the paste is at its best.
In your routine, pair it intentionally with henna powder for more predictable depth and coverage.
Tools and clean-workstation setup (your dye mise en place)
Set up like you would for any small-batch herbal production: everything within reach, nothing you don’t need. Indigo punishes delays.
Core kit:
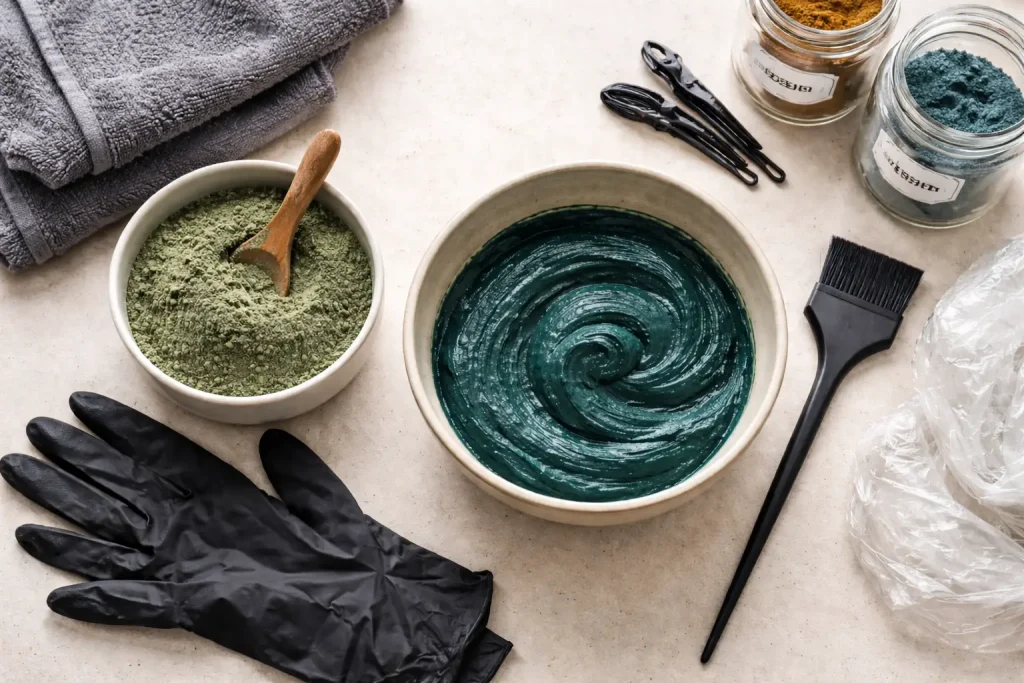
Gloves, old towel, cape or dark T-shirt, wide hair clips, applicator brush, non-metal bowl, spoon or silicone spatula, shower cap or cling film, and a timer. Keep paper towels and a small trash bowl nearby.
Batching mindset:
Pre-measure powders before you add water. Decide your method (two-step or one-step mix) before you start. Once the paste is hydrated, you’re on the clock.
Texture target:
Aim for “Greek yogurt that slowly ribbons”. Too thin drips and stains everything. Too thick won’t saturate hair evenly.
If you want a smoother, less gritty application, sift your powders. It’s a small step that feels luxurious at rinse-out.
Optional routine helpers:
A cleansing pre-wash with shikakai powder can help remove oils so dye binds more evenly, especially if you use heavy styling products.
Choosing your method: two-step vs one-step (and why it matters)
There are two common ways to work with indigo: the two-step process (henna first, indigo second) and the one-step blend (mixing both together). Both can work, but they behave differently.
Two-step is best when:
You want deeper brunette tones, stronger grey blending, and more predictable coverage. Henna lays a warm base, then indigo adds depth.
One-step blend is best when:
You want a softer brown, less “inky” depth, or you’re maintaining an existing tone without chasing maximum darkness.
Production note:
Two-step takes longer overall, but each paste is used at peak strength because you mix and apply each phase promptly. That’s often why it feels more reliable.
If your goal is “repeatable results”, start with the two-step. It’s less mysterious, more controllable, and scales better if you’re doing multiple heads of hair (family or clients).
Indigo Powder + Henna Powder ratios (grams + teaspoons) that actually repeat
Here’s a practical ratio section you can use without guessing. Adjust for hair length and density, but keep the proportions consistent.
Approximate powder amounts by hair length (total powder per application):
Short hair: 50 to 70 g
Medium hair: 80 to 120 g
Long hair: 140 to 200 g
Two-step baseline:
Step 1: Henna only
Step 2: Indigo only
One-step blend baseline (for brown):
2 parts henna to 1 part indigo (warmer brown)
1 part henna to 1 part indigo (medium brown)
1 part henna to 2 parts indigo (darker brown)
Exact small-batch examples:
Medium hair, medium brown (one-step):
60 g henna + 60 g indigo
That’s roughly 12 teaspoons henna + 12 teaspoons indigo (approx. 5 g per teaspoon, depending on grind and humidity)
Short hair, warm brown (one-step):
40 g henna + 20 g indigo
That’s roughly 8 teaspoons henna + 4 teaspoons indigo
Water guideline:
Add warm water gradually until you hit the yogurt texture. For 100 g total powder, you’ll often land around 200 to 260 ml water, but humidity and grind change this. Go by texture, not a single number.
For a smoother routine on textured or dry hair, many herbalists add a small amount of amla powder to the henna step (not the indigo step) to support a balanced feel and help avoid an overly warm finish.
Mixing and timing: water temperature, rest window, and oxidation
This is where most routines succeed or fail.
Water temperature:
Use warm water, roughly bath-warm. If it’s too hot, you can weaken performance or shift texture fast. If it’s too cool, you get clumps and uneven hydration.
Resting:
Henna is often rested longer. Indigo is typically mixed and used quickly. The goal is to apply while the paste is fresh and active, not after it’s sat around while you answer messages.
Oxygen and color shift:
Expect the paste surface to darken as it meets air. That’s normal. Stir gently before loading your brush.
Salt note:
Some people add a pinch of salt to indigo mixes for grip. If you do, keep it minimal and record it so you can repeat or remove it intentionally. Consistency is the real secret.
If you’re making multiple bowls (for a small salon day), pre-measure several portions of indigo powder dry, then hydrate each portion right before you apply. That keeps each bowl in its best window.
For an aromatic rinse routine after dye day, rosemary leaf makes a classic, clean-smelling herbal infusion that feels refreshing without competing with the dye process.
Application technique for even coverage (especially greys)
Sectioning is everything. Think saturation, not painting the surface.
Step-by-step:
Start on clean, dry or lightly damp hair (choose one and keep it consistent).
Divide into 4 to 6 sections. Clip securely.
Apply to roots first, especially grey zones and the hairline.
Load the brush generously and press paste into the hair like you’re buttering thick toast.
Work down the length only after roots are fully covered.
Wrap with a shower cap to keep moisture in and prevent drying.
Timing:
Many routines sit 45 to 90 minutes, depending on desired depth and hair porosity. Track what you do. If you change everything every time, you’ll never know what worked.
Rinsing:
Rinse with lots of water first. If you use shampoo immediately, keep it gentle. Many people prefer to wait a bit before the first full shampoo so the tone settles.
If your scalp tends to feel sensitive after processing days, a mild botanical cleanse with chamomile flowers as a cooled tea rinse can feel soothing and clean, purely as a comfort ritual (not a treatment claim).
Storage + Quality: airtight habits, humidity control, and sensory cues
Indigo is a quality-sensitive botanical. Store it like you’d store a precious culinary powder: sealed, cool, dark, and dry.
Airtight:
Transfer to a truly airtight container if the bag isn’t robust. Add a moisture absorber packet if you live in a humid climate (keep it food-safe and not touching the powder).
Humidity:
Humidity is the quiet performance killer. If powder clumps, smells stale, or loses its fresh “green” character, results can become less vibrant or less consistent.
Color and scent cues:
Fresh powder often smells green, plant-like, slightly earthy. If it smells flat, dusty, or oddly muted, it may be older or moisture-affected. Color can vary by batch, but you want a lively, botanical look rather than a dull, greyed-out tone.
Paste storage:
In general, plan to mix and use promptly rather than storing mixed paste. If you must pause briefly, cover the bowl tightly to slow drying and oxidation, but don’t expect next-day performance to match fresh.
If you like keeping your routine tools tidy and residue-free, a pre-wash mask made from neem leaf (very light, brief contact, then rinse) can help reset scalp and hair feel between dye cycles, especially for people who build up oils or styling products.
Troubleshooting: flat flavor, too tart, over-carbonation, sediment, aroma loss
This section uses a simple sensory framework tea makers understand. Translate “flavor” and “aroma” into “tone” and “freshness” and you’ll diagnose issues faster.
Flat flavor (color looks flat or weak):
Usually timing or old powder. Mix smaller batches and apply faster. Check storage humidity. Make sure hair is clean enough to accept paste.
Too tart (paste feels overly sharp, stingy, or the tone pulls too warm):
Often too much acidity in the henna step, or leaving henna on too long for your hair. Keep additives minimal and repeatable. Consider shifting toward a two-step routine rather than pushing a one-step mix.
Over-carbonation (paste puffs, foams, or behaves strangely as if “active”):
This can happen if you add sugary or fermentable ingredients, or if you cover a very warm bowl and it traps heat. Keep formulas simple. Use warm water, not hot. Avoid kitchen-experiment add-ins that you can’t repeat precisely.
Sediment (gritty rinse-out or patchy deposit):
Sift powders, mix more thoroughly, and add water gradually to avoid dry pockets. Apply with pressure and saturation. If your water is very hard, consider using filtered water for mixing.
Aroma loss (paste smells dull and results feel less “alive”):
Classic sign of age or humidity exposure. Improve storage and buy in quantities you can use while fresh. Keep containers sealed between uses.
If you want a smoother, more “finished” feel after rinsing, a light botanical rinse using calendula petals can be a pleasant ritual for slip and softness, especially on dry ends.
Safety: staining, patch tests, and compliant, practical caution
This is a cosmetic routine and should be treated with basic production safety.
Patch test:
If you’re new to botanical dyes or have sensitive skin, do a small patch test first. It’s a simple risk-reducer.
Protect surfaces:
These powders stain. Cover counters, wear gloves, and keep towels dark. Treat it like you’re working with ink.
Eye and inhalation caution:
Avoid getting powder or paste into eyes. Mix gently to reduce airborne dust. If you’re sensitive to fine powders, consider a mask while measuring.
Hair condition:
If hair is damaged or highly porous, results may grab darker or unevenly. Do strand tests before committing to a full head, especially if you’ve recently bleached or chemically treated hair.
No medical claims:
Botanical routines are traditionally used for color and cosmetic results. Any comfort rituals (like herbal rinses) should be understood as personal care practices, not medical treatment.
A simple repeatable routine you can document and improve
If you want consistency, treat your routine like a small batch log.
Record:
Date, method (two-step or one-step), grams used, water temperature feel, rest time, application time, total processing time, and how it looked at 24 and 72 hours.
Standardize:
Keep your bowl type, brush, and section count consistent. Change one variable at a time if you’re adjusting.
Scale:
For multiple applications, pre-measure dry powders into labeled jars. Hydrate one jar at a time. This keeps each batch fresh and reduces chaos.
If you’re building a full “herbal hair day” ritual, you can rotate supportive botanicals between dye sessions rather than dumping everything into the dye bowl. A separate cleanse with shikakai powder or a gentle rinse with chamomile flowers often keeps the system simpler and more repeatable.
Keeping indigo consistent in real life
The secret to indigo powder is not a secret ingredient. It’s timing, measurement, and storage. When you treat it like a fresh botanical material with a peak window, it becomes predictable: mix warm, apply promptly, saturate thoroughly, and store airtight away from humidity. Pair it thoughtfully with henna powder when you want depth and reliability, and keep your routine notes so each session gets easier. Once your workflow is dialed in, you’ll stop chasing luck and start producing the same beautiful, natural-looking tone on purpose.
FAQ
How long should I let indigo paste sit before applying?
Keep the wait short. Mix, smooth out clumps, and apply while it still feels fresh and active.
Can I mix indigo powder with henna in one bowl?
Yes. One-step blends can make browns, but two-step routines often give more reliable depth and coverage.
Why did my color look weaker this time?
Common causes are old or humidity-exposed powder, slow application, or hair that wasn’t clean enough for even deposit.
Does indigo work on grey hair?
It can help blend greys, especially when you lay a henna base first and focus on saturation at the roots.
What water temperature is best for mixing?
Warm, bath-like water is a solid default. Very hot water can make the paste behave unpredictably.
Can I store leftover mixed paste for later?
Performance is best when fresh. If you must pause, cover tightly for a short time, but don’t expect next-day results to match.
How do I store indigo powder long-term?
Airtight container, cool and dark location, and protect it from humidity. Watch for clumping and dull aroma.
Can I add other herbs to the mix?
Keep formulas simple. Use other botanicals as pre-cleanses or rinses rather than complicating the dye bowl.